How to Upload Multiple Images Into Cricut Design Space
Hi Daydreamers!
Today you lot will learn everything there's to know about the Piece tool in Cricut Design Infinite.
Just…What is Slice in the Cricut World?
The Slice tool is an option in Cricut Blueprint Infinite that allows yous to split and crop out two overlapping images or layers in society to create a whole new design.
This tool is Astonishing, and one of my favorites – by the way – considering with information technology you tin personalize and create new custom designs with existing shapes, and images.
Seriously….
If you main the Slice tool, Y'all WILL MASTER your Cricut.
If y'all are a beginner and are still figuring out Cricut'southward software, I recommend that you lot read my fantastic andUltimate Cricut Design Space tutorial.
In a nutshell, these are the topics I will be covering in this tutorial:
- Where to find the Slice Tool.
- Mini tutorial on how Slice works
- How to Piece multiple images
- How to ingather images using the Slice Tool
- What is the "Slice & Set Method"
- Where is Slice in Cricut's App?
- Combining Slice with other tools similar Weld, Duplicate, Flip, and more!
- Examples of when to employ Piece.
Ready to become a pro at slicing?
Tip: if you desire to acquire everything you need to know about iron-on (HTV) and master how to use it on different surfaces, brand sure to check this astonishing tutorial I put together.
The Piece tool is located at the bottom of the Layers panel, and information technology activates when y'all accept Merely two layers selected.
You Tin'T Slice more than than two layers because the program wouldn't know what shape to cut against the other i. Don't be disappointed though, I will show you a play tricks to Slice multiple images after this mini-tutorial.
At present, allow's run across in a glance how Slice works.

Drop a square and a middle on the Sail Area by clicking on the Shapes button located on the left panel.
Bank check out the following graphic and let'southward have a niggling chat of what I did.
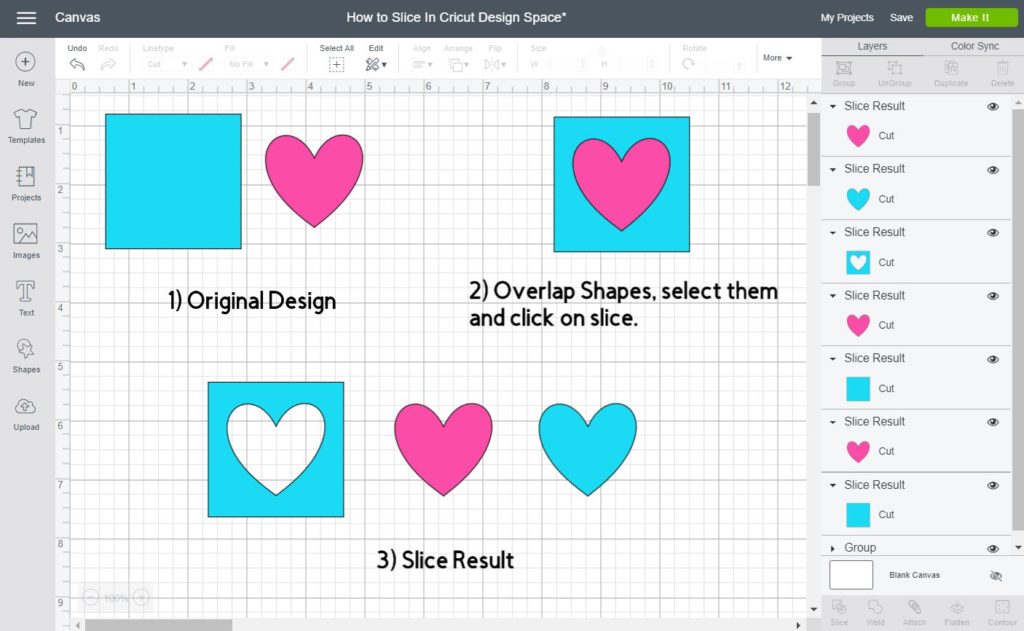
- The original designs were a square and a centre right? However, I wanted to cut the heart out – that sounds creepy lol – of the square.
- To do this, only place the heart on top of the foursquare, select both layers and click on the Piece button.
- After slicing y'all volition always have 3 unlike layers.
- The i you wanted to "piece" out of the bigger shape – In this instance, the pinkish centre.
- A copy of the shape you lot wanted to "piece" out – In this example, the blue heart.
- And last but not least, and the reason you sliced in the first place, a new design with a cut out of the paradigm you used to "piece" against – In this example the blueish square.
Piece of cake, right?
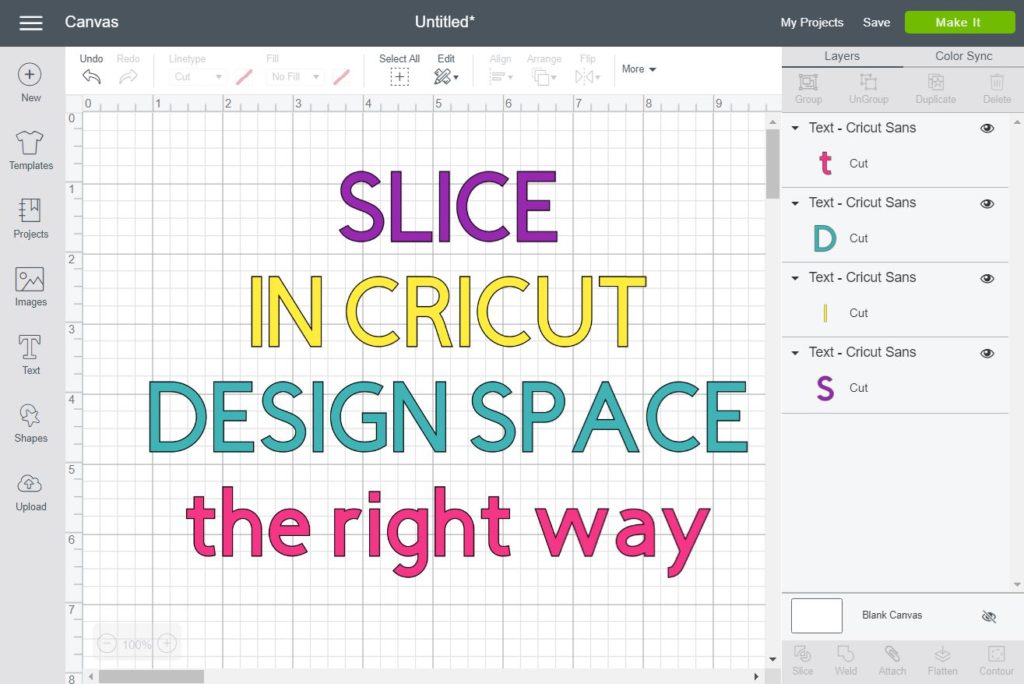
Notation: This same concept applies to TEXT, instead of a eye you could have used a word or even a line of text. So to slice text you lot just need to make sure all of your text is in a unmarried layer.
Now that yous know how slice works let's come across what else you can practise with this tool.
How to Slice Multiple images on Cricut Design Space?
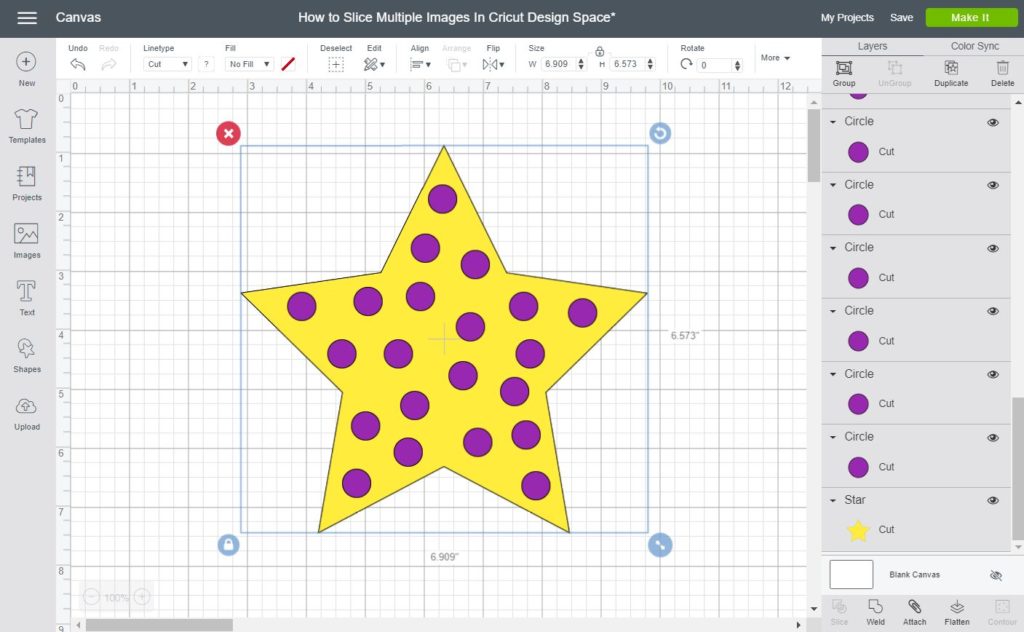
The following screenshot is a yellow star with multiple circles on summit. My goal with this design is to cutting out all of the circles from the star.
But, how do we do it if we have more than than two layers?
Slice every circle against the star one at the fourth dimension? No give thanks y'all! that would take forever.
The respond to this is "WELD."
When you have multiple – scattered – layers and y'all want to cutting them out of another shape, you tin can't do this just by selecting them and then slicing.
Remember Cricut But allows you lot to slice two layers at a time.
This is what you lot need to do to slice out multiple images, and or shapes.
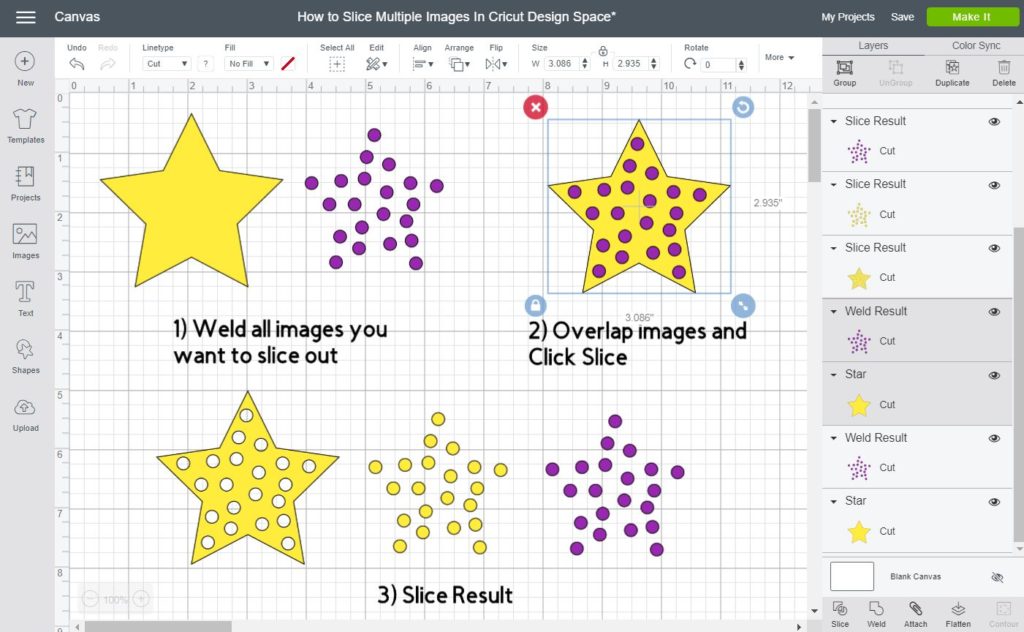
- Select all of the layers you want to cut out and weld them. The "Weld" tool is located at the bottom of the layers console but to the right of the piece tool.
- After y'all weld, you will encounter that all of the circles are in one layer. Now, overlap them on pinnacle of the star, and click on the piece pick.
- After slicing you lot volition have iii dissimilar results.
- Imperial circles
- Yellowish circles
- A star with multiple cutting-outs.
IMPORTANT: Later on welding, you lot won't be able to separate the circles, and then if you call back you will need them later on on you should brand a re-create, then group them all, and hide their visibility.
I explain this better on my "Weld, Attach and Group" commodity. All of these options are sort of intertwined so I encourage you to check information technology out.
I accept seen multiple tutorials on Cricut Blueprint Infinite, but I take withal to see one where yous can learn how to Crop Images and or photos.
Complex images or photos like .jpg or .png files are not really meant to be cutting piece by pieces like an SVG or cutting file. These types of images are for you to Impress and then Cut.
When you upload the photograph, you Exercise take the option to Crop it, but that is a foursquare crop and nothing like what I am most to testify you. If you desire to learn the Print then Cut process for photos and/or .jpg images I encourage y'all to read my super astonishing tutorial.
Gear up for cropping?

- Click on the Upload button located on the left panel of the sheet and select the photos you want to piece of work with. Then add the shape you want to use for cropping.
- Overlap the shape where you want to Crop, and so select both the shape and the photo, and click on the piece.
- Look that this time, for the "slice result" we are actually using the hearts. This just goes to evidence that you accept many possibilities with this program.
Let's see more examples.

I used an octagon, a star, a circle to create unlike crops and effects for my images. If you want more than of a standard ingather y'all tin can likewise utilise a square and unlock its proportions to create a rectangle.
Note: the proportions tin can be changed by selecting the shape/layer and clicking on the fiddling lock located on the left-hand corner of the pick.
What is the Piece and Set Method?
When yous are using multiple colors in your projects, in that location's a moment where y'all'll demand to learn how to layer them upwards on the surface of your project.
This is extremely important when using materials similar Cricut Infusible Ink, where your projection volition be ruined in y'all don't apply this method.
Look at the following instance.
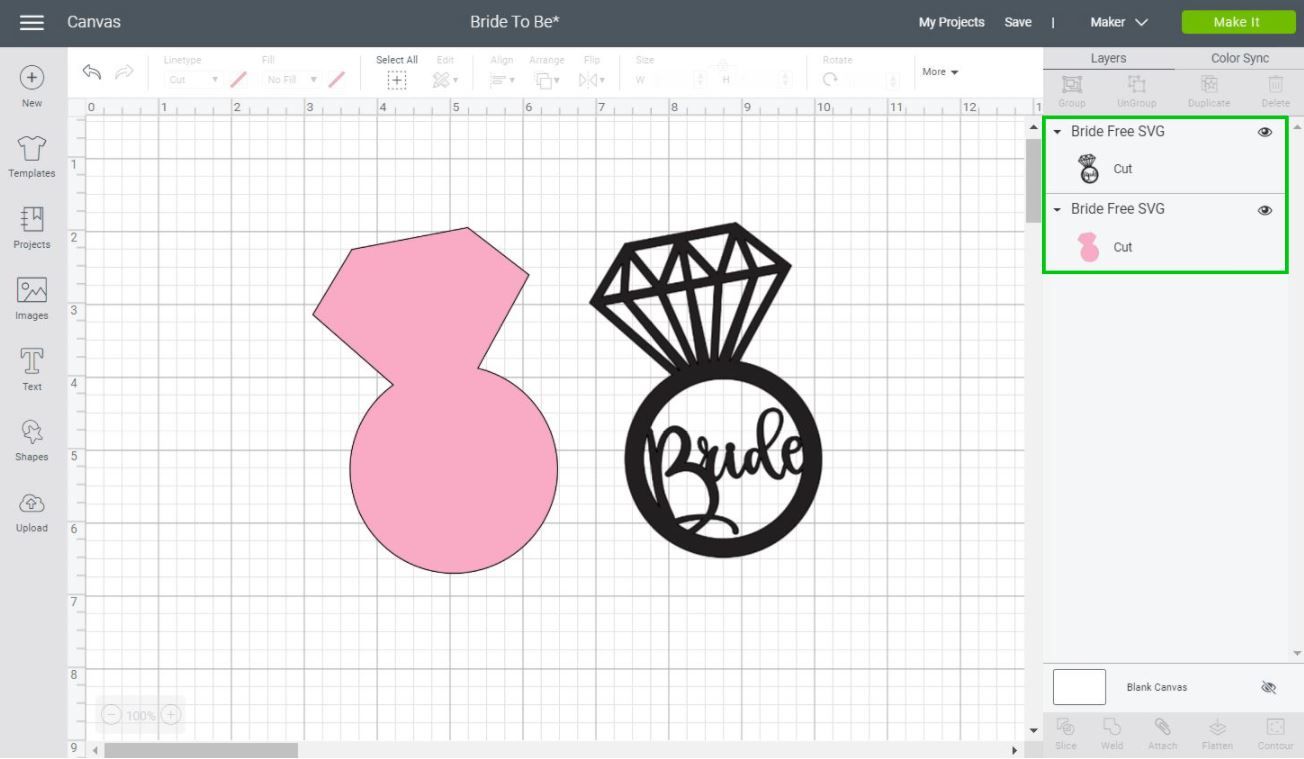
This a blueprint of an engagement ring and outline that can be used to make a t-shirt with Infusible Ink.
Initially, the outline is solid, and if yous were to layer up both similar this when using Infusible Ink materials, your projection won't wait good.
Trust me!
To apply the "Slice and Set" method, align both images, select them, and click on "Slice."
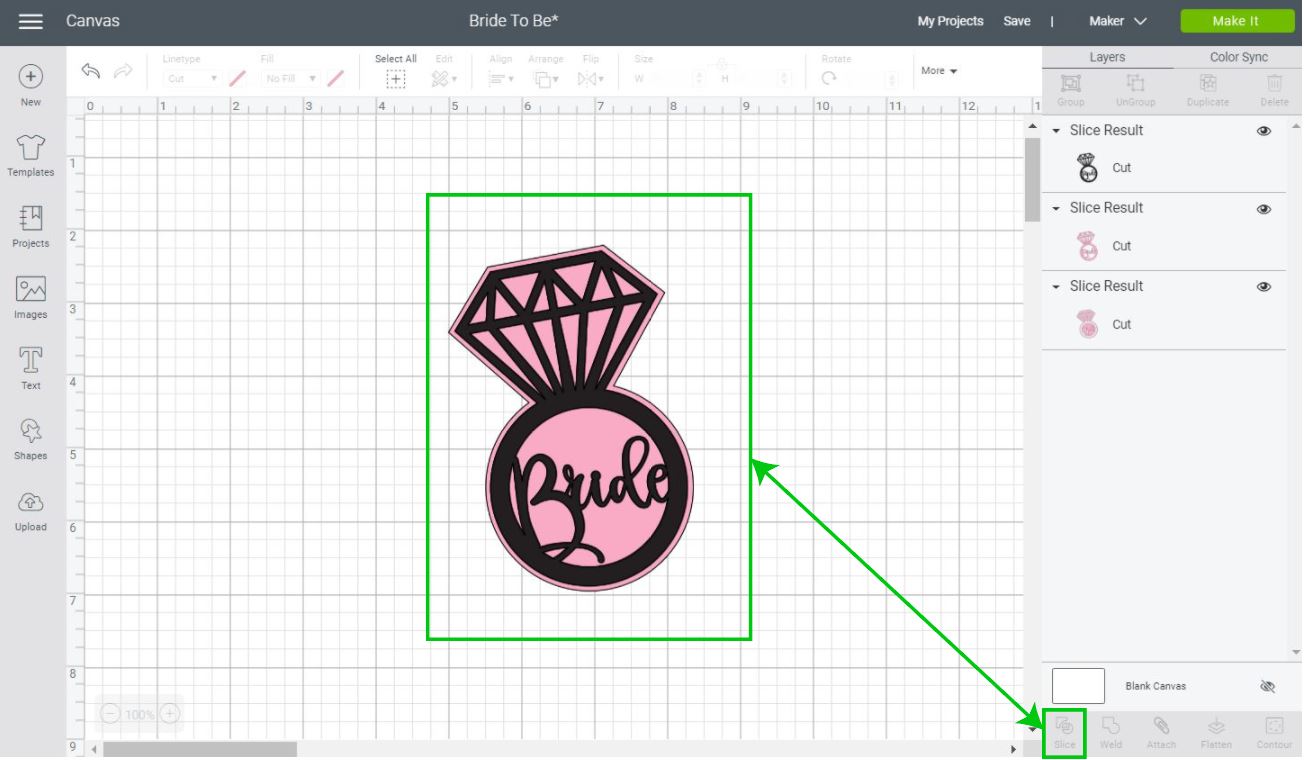
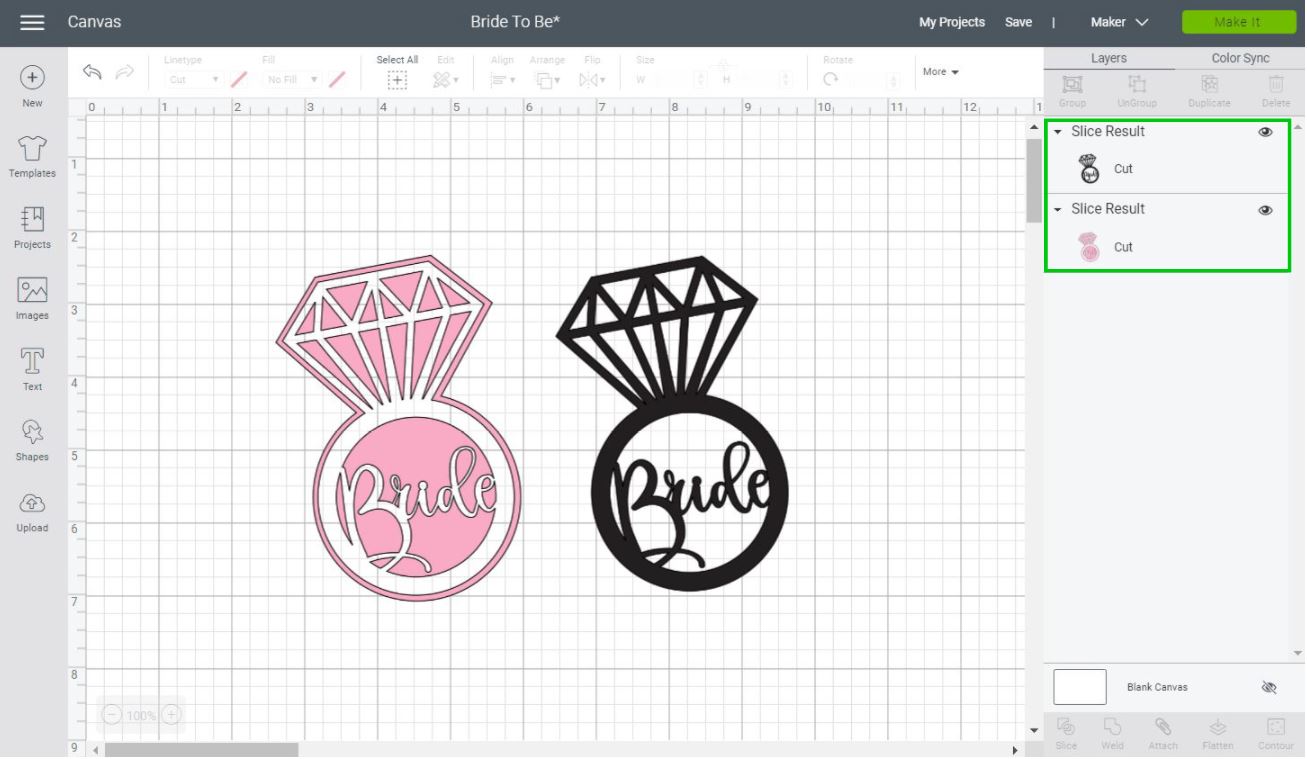
After slicing you'll have iii different images (sometimes, more).

And, in this case, nosotros only need two of them, the black layer, and the outline layer with the cut-out nosotros just made.
To larn more virtually using Infusible Ink on t-shirts, make sure to check out this step by step tutorial I wrote.
Although the "Slice and Set" method is mainly used with Cricut Infusible Ink products, you tin can as well employ it with adhesive and HTV vinyl.
If you lot proceed layering up colors and layers, your design tin can look bulky, and you don't want that!
Where is Slice in the Phone App?
All of the things I've been education y'all throughout this tutorial can be done within the Cricut Blueprint Space App.
In Cricut'south App, the "Slice Tool" is in the "Activeness" button located on the bottom panel of the canvas area.
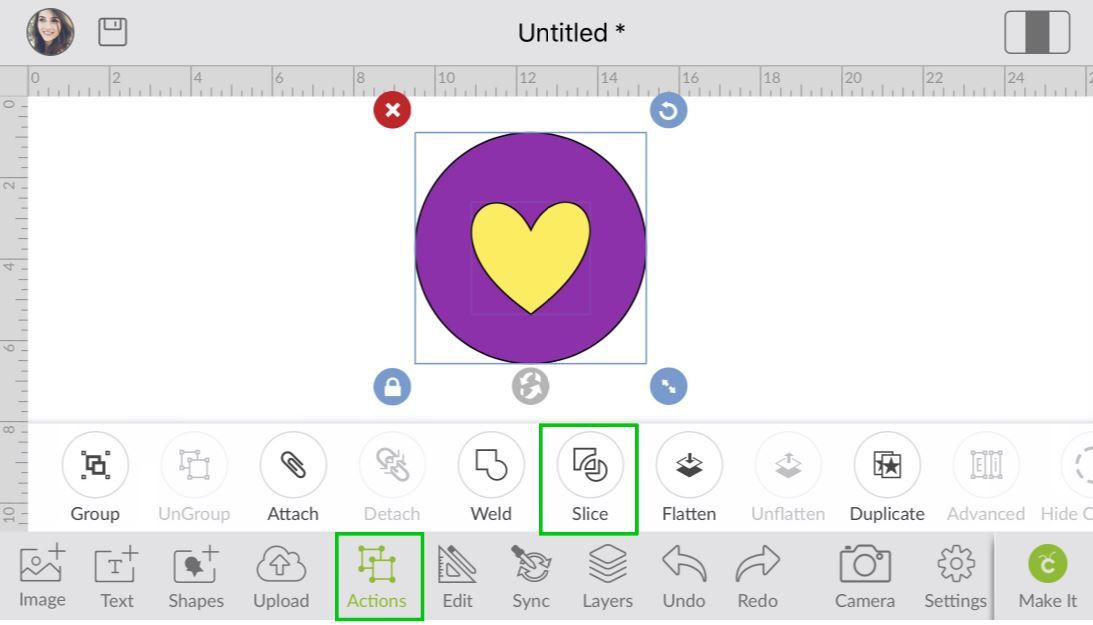
Call up that yous need to have two images selected to activate the piece tool.
If you aren't familiar with Cricut's app, I have a handy tutorial that volition teach what every button is for, and where is located.
And then far you've learned main things:
- Slice against 2 shapes
- Slice multiple images
- Using piece to Ingather images in Cricut Design Space
- Slice and Set Method
- Where Piece is in Cricut's app.
Now, information technology's fourth dimension to intertwine "Slice" with other tools and create something new out of two existing images inside Cricut'south Library. (Don't worry I used free ones)
If yous are just getting started with Cricut this may be challenging, but I am doing my best to explain to y'all as much as I can. If you don't sympathise something, please go to my beginner'due south tutorial that I linked at the beginning of this post.
Let'southward get started!
Add Images to Cricut Pattern Space
To add individual images from Cricut's Library, click on the Images button located on the left panel of the canvas.
A new interface volition announced for you to insert the images. If you like FREE stuff every bit I practice, click on the filter and check the choice FREE.

I don't know if the images I chose will be free by the time you lot follow forth with this tutorial, and so if they don't appear in the free section, simply uncheck the box and wait by their codes instead: #M54A5D & #M4FCE3A.
And If for some reason they aren't free you can still play with them, you just can't cutting them without paying.
I selected some butterflies and flowers. You will be able to see them amend in the side by side screenshot.
Ungroup Images and Delete Unwanted Pieces
When you insert the butterflies and flowers yous will notice that they are grouped.
Since we are but going to use the last butterfly and the pink flowers, become ahead and select each blossom and click on the ungroup option located at the top of the Layers panel.
Delete the unwanted pieces, beginning three butterflies and orangish flowers.

Create a New Pattern
We are getting so close to creating a really cool design! The goal with this pattern is to slice out flowers on each of one of the butterfly's wings.
After ungrouping and deleting the unwanted pieces we were left with one butterfly and 3 flowers.
Check out the post-obit screenshot and let'south take a little conversation virtually it.
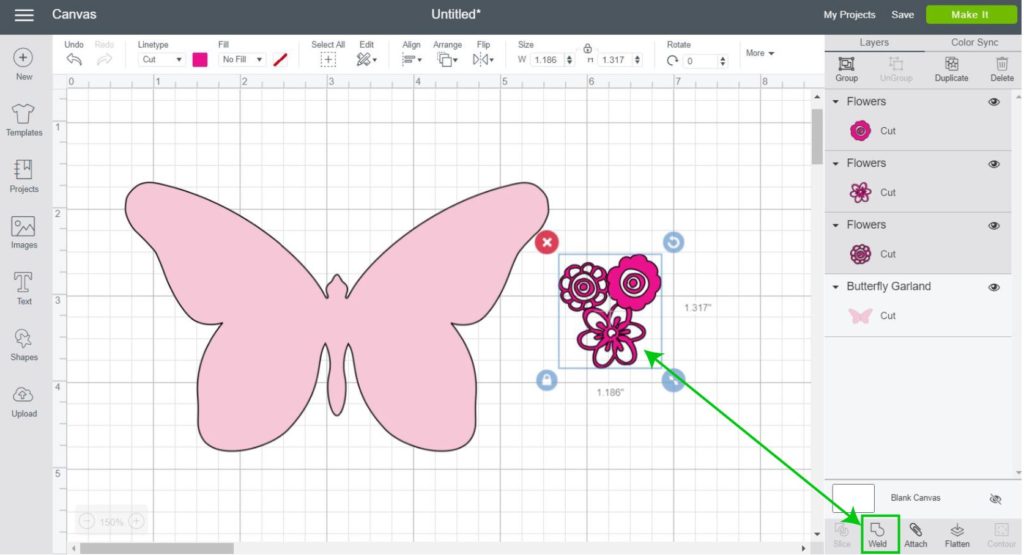
What I did was to organize the flowers in a more appealing fashion. I overlapped them a little flake as well – but yous don't take likewise – and clicked on "Weld" to create a whole new shape/or single layer.
Since I wanted to have more flowers on every wing I duplicated the already welded flowers and after arranging them I welded them over again.
Notation: y'all can besides duplicate past selecting the flower and using the keyboard shortcuts Ctrl + C and and then Ctrl + V. If y'all have a mac, y'all would use the Cmd fundamental.

This is how they should wait.
Utilise Indistinguishable, Flip and Weld to Complete
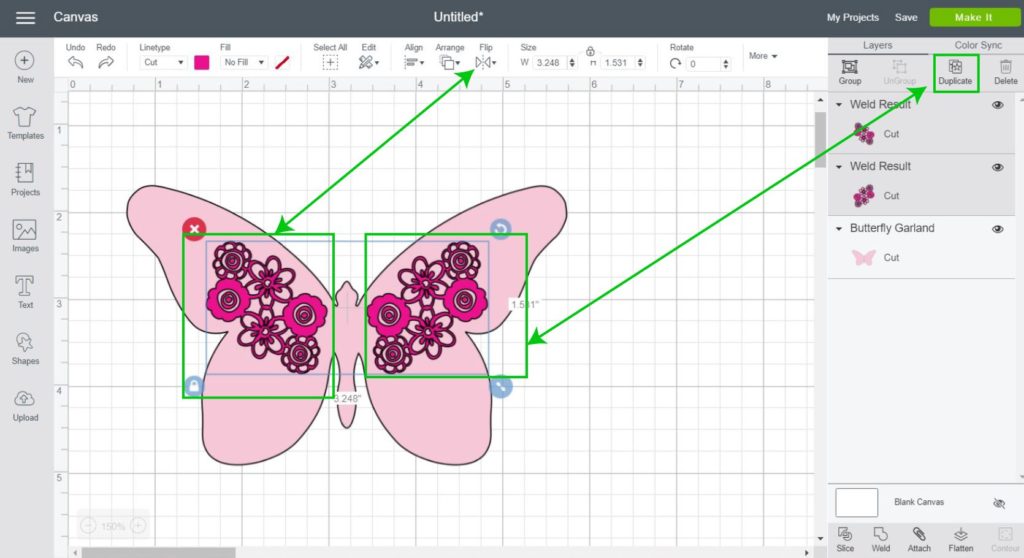
It's time to add flowers to each of the wings.
Select the first floral design and rotate/move it to fit the upper-right fly of the butterfly. Note: you tin can rotate, and resize your file past selecting so moving the niggling icons – arrows – on the right side corners of the choice.
Afterward organizing floral on the right wing; go ahead and duplicate it, then click on FLIP – select the horizontal to create a perfect mirror – and arrange copy on the left wing.
We are almost done!
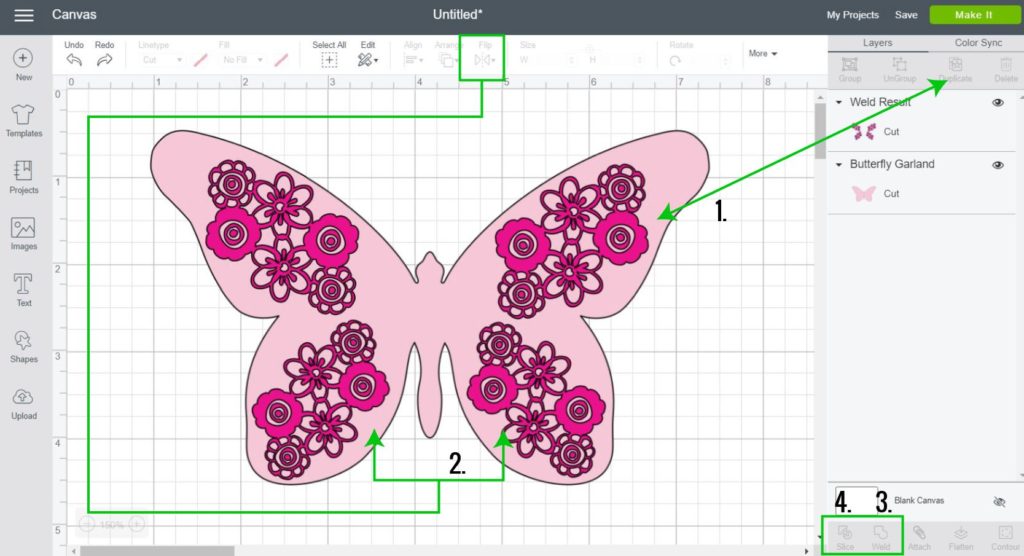
These are the following steps to finish our designs:
- To add the flowers to the lower wings, first select both of the top floral designs and click on "Indistinguishable."
- Then click on Flip – Select Flip Vertical to create a perfect mirror – and organize the new floral design on top of the remaining wings.
- Select all 4 floral layers and click on "Weld" to have everything on 1 layer.
- Last but non least, and the reason why you are reading this tutorial, select both the butterfly and flowers and click on "Slice."
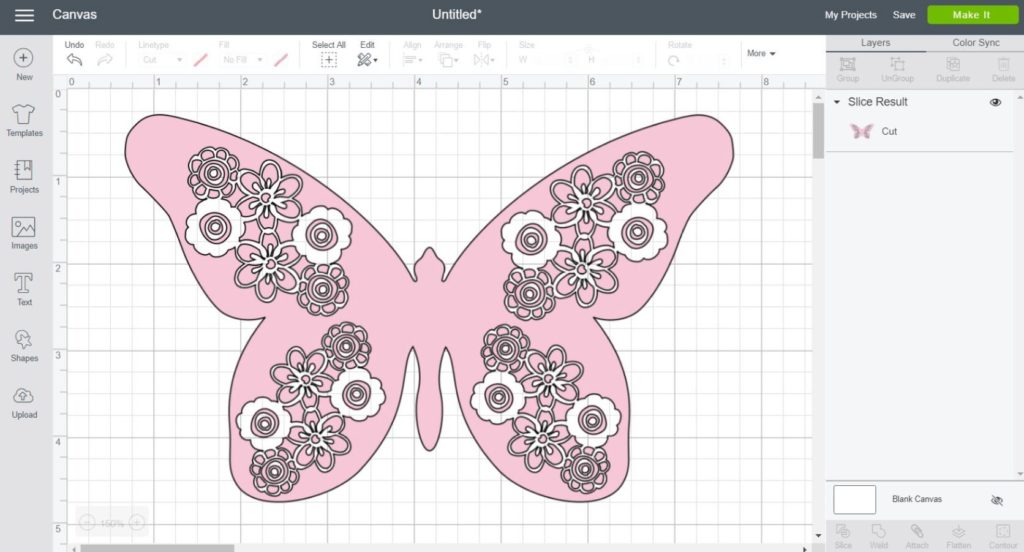
Slice Result & Where to Apply Place it
After all of that work, we now have a beautiful custom blueprint made out of two completely different images.
Seriously, your imagination and inventiveness is the limit! Trust me, your figurer won't intermission by you trying to do these sorts of things.
Experiment, try, and furthermore, NEVER Give up!
Where would you like to come across this pattern?
I used templates to get an idea of where this blueprint would look practiced on, and I call back it would look very cute on some throw pillows.
Don't you think?
Learn more nearly templates on this article I wrote.

Examples of Using Slice
What I just showed it's only the get-go of the Piece tool. Here are some real-life applications of the Slice tool.
- Gift Tags: Utilise piece to brand dial holes.
- Making Cards with beautiful cut-outs
- Perfect to brand rounded shapes in Cricut Design Infinite.
- Make words into shapes.
Make sure you visit each link to learn the Slice technique I used in the projects I merely mentioned.
Materials
- It depends on the project you want to brand.
Tools
- Cricut Machine
- Cricut Pattern Infinite (App or Phone)
Instructions
one. Add the shapes, or images you want to slice
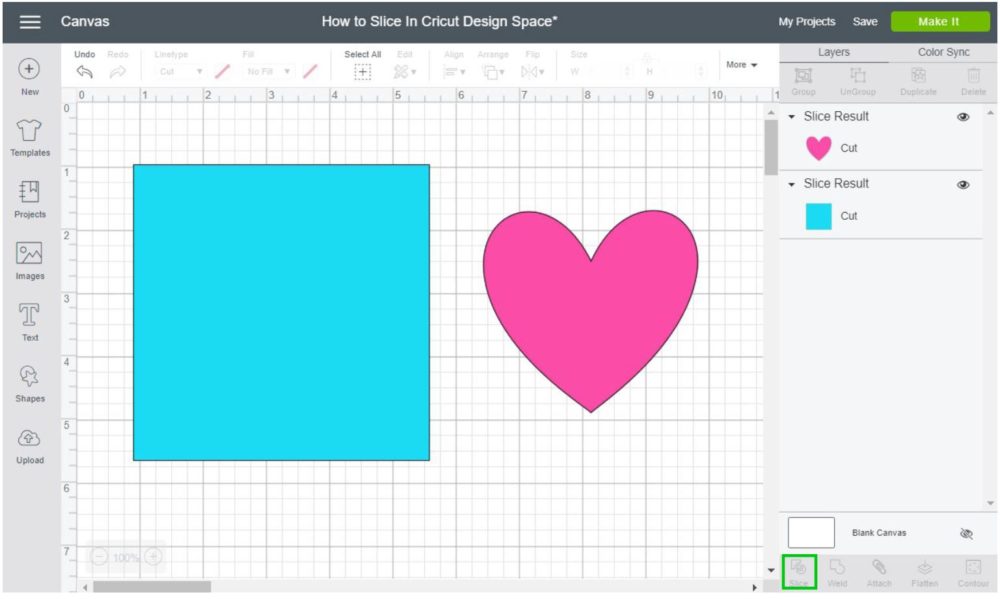
2. Arrange images the way you want to slice them. In this case, I place the heart on superlative of the square. Click on the "Piece" buttons located at bottom of the Layers panel and deleted unwanted results.

Notes
- Remember that "Slice" only works with ii layers at the fourth dimension.
- If y'all slice text confronting an paradigm, you lot tin can't edit the text. Therefore, before "Slicing" make sure your text looks the fashion you lot want information technology.
Y'all Did it!
If you followed along with this tutorial and want to put in practice everything y'all've merely learned; CONGRATULATIONS you are a Slice Main!
Oh!
And just and then you know, I besides have a library full of free SVG files and Printables for all of my subscribers, a.1000.a Daydreamers. You tin can see a preview right here or get access by filling out this form.

torresthalketithed.blogspot.com
Source: https://www.daydreamintoreality.com/slice-crop-cricut/
0 Response to "How to Upload Multiple Images Into Cricut Design Space"
Postar um comentário